

Showing posts with label nail. Show all posts
Showing posts with label nail. Show all posts
Monday, January 16, 2012


Sunday, January 16, 2011
Haul it in! I love free stuff - Third Haul of 2011
I successfully reached a $25 Amazon.com gift card reward through my Amazon Visa and decided to use it up on some nail stuff I've been wanting for a while now.
I got these from the Amazon seller named "KJ Beauty Store." I have nothing but nice thoughts about them due to this order. Everything went very smoothly. Technically each item that I bought from them had a shipping fee of $2.99 to $3.99 but when I paid for it all together my shipping was only $5.99 total, so that's awesome. Highly recommend KJ Beauty Store on Amazon.com for your Konad needs.
 |
| From left: Konad Black Nail polish and Yellow Nail polish, Konad OneTouch Remover bottle, and Double-sided Konad Stamp set |
1. Polishes: I have been wanting to print a vivid black print onto my nails ever since I started working with Konad but none of my black nail polishes ever quite did the trick. Konad's expensive though, so I couldn't just go and use $8 to buy a simple black nail polish. Good thing I got these for free! The yellow one was one that I bought on the fly, because I knew I wanted another color but wasn't really sure which one. I can see myself doing some yellow stamping on a dark base color. That'd be cool. Bumble bee nails, anyone? I'm excited.
2. Bottle: I was really happy to find that Konad makes these because for the past few weeks I've been wanting a bottle with a push top like this one. I considered getting one from Sephora. My sister is a regular reviewer on there so she reads reviews on a lot of products and she actually told me that their bottles are kinda iffy -- like I'd have to buy one and make sure it works and then keep exchanging it until I get a good one. Not really worth my trouble, plus $11 bucks for a plastic bottle? I even looked through Target and Walmart because I vaguely remember using a toner (that didn't work well on me- was it Almay?) that had that kind of dispenser on the bottle. I figured the drugstore product would coast me about $5ish and I could just dump out what's inside and keep the bottle. But no luck. Really glad I found this on eBay and then got it for free on Amazon. It works wonderfully and will surely come in handy.
3. Double Stamper set: I've been wanting this for a long time too! Mostly because I thought it would be smaller, actually. :| But it turns out that having a bigger stamp is pretty convenient for me because I have large hands for a girl, and this one is more comfortable to hold than the one that came with the set that my sister bought me. I think it will really come in handy to have two scrapers too, because I noticed that sometimes I get polish buildup while I'm doing my nails and I have to stop and clean it off -- which kinda puts me at risk for getting cotton lint on my newly painted nails. Or maybe I'm just making up excuses for using my gift card on something like this. Either way... I'm happy I have it. :)
Till next time. Comin' up: Half-moon manicure /slash/ reverse-French manicure!
Wednesday, December 29, 2010
December 2010 Haul
It's been a while since I bought these but I thought I'd share anyway.


- Sally Hansen Insta-dry #250 "Lightening" from Walmart
- Sally Hansen Insta-dry #16 "Blush Rush" from Walmart
- Konad stamp plate m60 and m79 from the seller "trendservices" on eBay
On the polishes: Whoever said those nail polishes are insta-dry was wrong. They take forever to dry! Luckily I really enjoy doing my nails so it didn't make a difference that I had to wait for them to finish. :)
On the plates: I noticed when I've playing around with konad stamping that I needed more full-nail stamps, so I found these online and ordered them. They've been great!
Saturday, November 20, 2010
Black tips, white hearts

Can I just say that I loved these nails? They were so frickin cute.
What I used:
- Top and Base Coats: The usual!
- Tips: Nicole by O.P.I. in "Razzle Dazzler" -- 2 coats by hand.
- Hearts: Konad plate m56 with Konad white nail polish
Soooo cutie. I'm surprised at how good they came out... I'm getting better at painting on tips and my aim's improved as far as stamping goes.
Tuesday, November 2, 2010
Dark Fall Nails
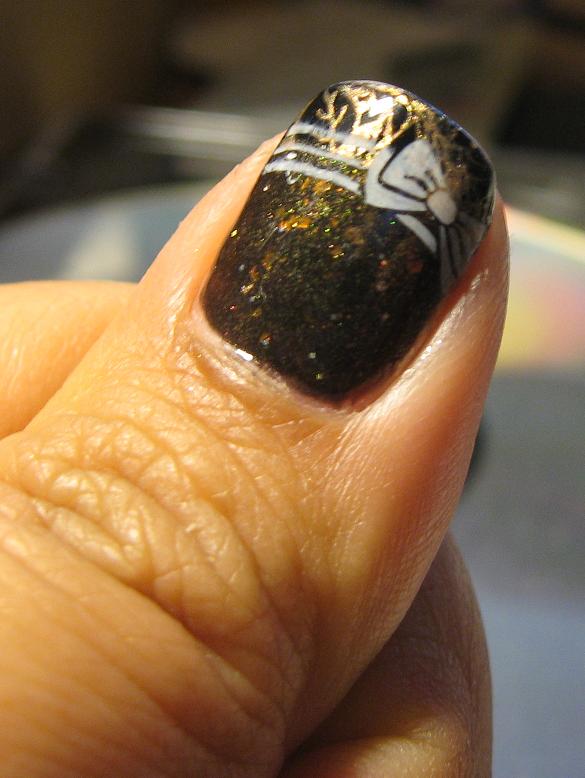

What I used:
- Avon Smooth Beginnings Base Coat -- 1 coat
- Base: Sally Girl "Gotta Have It" -- 1 coat
- Glittery color: Sephora by OPI " in 212-SEPHORA SE 016 -- 1 coat
- Black Tip background: Nicole by OPI in "Razzle Dazzler" -- 1 coat
- Tip Stamp: Leaf Design on Konad Stamp Plate #m56 in Savvy Nail Lacquer "Golden Honey"
- Bow Stamp from Konad plate #m56 in Petites "French White"
- Top Coat: Top Coat: Avon Nail Experts UV Gloss Guard Top Coat -- 1-2 coats
I don't like that my Avon topcoat streaks the paint underneath. I may have to look out for a new brand.
Thursday, October 28, 2010
Halloween Frankenstein 2010
I had fun with these last night. :)

Happy and angry Frankensteins. Well, Dr. Frankenstein's monster, but you get it.
What I used:
- Avon Smooth Beginnings Base Coat -- 1 coat
- Main colors:
- Orly Nail Lacquer in "Green with Envy" -- 3 coats
- Sephora by O.P.I. Nail Colour in "What a Broad" -- 2 coats
- Stripes:
- Orly Nail Lacquer in "Green with Envy"-- 1 coat
- Covered with glitter before applying tips
- Glitter: Sally Girl in "So Disco"
- Faces:
- Nicole by OPI in "Razzle Dazzler"
- Ear plugs: Nicole by OPI in "It's up to you" with Petites "French White" applied on top
- Tips: Nicole by OPI in "Razzle Dazzler" -- 2 coats
Wednesday, October 27, 2010
Halloween 2010 + Mini Haul
I did my nails at the beginning of October and never got around to posting it! Whoops! These pictures were taken when my nails were already starting to get worn out (and on a cold day... so my hands were dry!) Nothing special, just black, orange and quite polish along with some stickers floating around my box.


That's all for now! Time to wrap lumpia then do my new halloween nails. I bought some glow-in-the dark nail polish too, so that ought to be fun.


Mini Haul at Sally's
I wanted to do some green and purple halloween nails last week but realized I don't have the right kind of green that I had imagined. So... off to Sally Beauty Supply with my sister.

Picked up this "Green with Envy" color by Orly (love the rubber grippy handle!), a little sparkley nail polish, and some nail files. The big grey one is a replacement for the other one I've been using. I'm not actually sure how often you need to replace nail files but my other one is "gross" so I figured that's as good a reason as any to buy another $1.50 file. The skinny one should come in handy for filing the little edge that always shows up underneath my fingernail after I'm done shaping.
Tuesday, September 28, 2010
Lagomuffin cameo + Purple swirlies + Avon order
My sister, who writes awesome blogs as lagomuffin here on blogger, is making a cameo this week. :) She's a fan of plain, simple nails and has awesomely long fingernails that would probably look ghetto if she grew them out and filed them like I do. She's got my mom's hands. She likes doing single colors, MAYBE a top coat, sometimes both a top and base coat if she happens to be using my stuff. (By the way, most of my color choices are too loud for her taste... har har). I am still working on getting her to at least stamp ONE nail one of these days.
And Tissa the pookie is making a cameo in the cameo. Yes, she's laying on pretty, cutesy tissue paper.
Here are some nails from a couple weeks ago. I love this purple.


And Tissa the pookie is making a cameo in the cameo. Yes, she's laying on pretty, cutesy tissue paper.
 |
| My sister, lagomuffin, and Tissa the pookie. |

What I used:
- The usual basecoat and topcoat
- Base purple: Sephora by OPI --"What a Broad"
- Stamped swirlies:
- Konad m64 stamp plate; color:
- Finger Paints Nail Color --"It's an Original"
- Ring finger accent:
- Konad m53 stamp plate;
- Savvy Nail Lacquer --"Golden Honey #627088"
I really liked how the two purples looked with each other so I only stamped a gold accent on the ring finger.

And congratulations, I finally finished my first bottles of nail polish! I had to make another order of Avon Top coat and Base Coat because the ones I'm using are pretty goopy now. That, and they're really low and the polish only fills the bottle to the very tip of the brush. So, yay Avon! I have good timing, apparently, because both $6.00 bottles were on sale for $3.99. That basically equaled out to "free" shipping by the time I checked out, which is awesome considering I SO would have paid $6.00 for each bottle if I had the option of buying them in a store. Excellent.
No nail updates until I get those bottles in the mail, though. Till next time, folks.
Monday, February 22, 2010
Flowers and sprinkles
I finally had time to do some nails tonight. Yay!
LEFT HAND:

RIGHT HAND:

What I used:
LEFT HAND:

RIGHT HAND:

What I used:
- Base Coat: Avon Nail Experts Smooth Beginnings Base Coat -- 2 coats
- "Sprinkles" (as my sister calls them): Sally Girl #812005
- Stickers:
- Cina 3d nail decals in "blossoms" -- 133040
- Other cina flowers and butterflies -- unfortunately I don't have the name/numbers anymore.
- Top Coat: Avon Nail Experts UV Gloss Guard Top Coat -- 2 coats.
Wednesday, January 20, 2010
Nail Patch Walk-through

I'm kind of in a pinch for time lately, with all my school work and such. So I thought I'd take the easy way out and do a repeat nail job, and what quicker repeat can there be than the nail patches from Sephora that I raved about, huh?
And as a treat: a little walk through, because I felt like it. :)
BEFORE:

My french tips from last week have seen better days.

Removed nail polish with Onyx Acetone and a cotton ball.

Plain nails are ready for shaping!

Decided to go without corners this week. I've been doing square tips for a few weeks now and my nails could use a break from getting caught on everything. This is a nail file from my sister , who bought it from Body Shop a little while back. I really like nail files. :)

I treat my cuticles with Sephora by OPI cuticle oil. I don't really know how to do my nails the professional way, and the last time I tried to push my cuticles back I ended up damaging them. You can still see a little dimple on my right thumbnail tip from way back then... it's on its way to being grown out and filed off.


Reviewing the (very easy to follow) directions on the nail patches, so I don't mess up.

Open up the air-tight package.

The package comes with two sheets of 8 nail patches. Chances are you'll find the right size somewhere in there.

Found my sizes! Tore them off and put away the extras so I don't get confused later.

Carefully remove the white plastic on top.

Peel off the nail patch.

Applying the nail patch to my thumb. They're adhesive, but strong enough so that if you mess up, you can reposition the sticker and it won't rip or tear.

Tucking in the excess nail patch. The extra stuff tears off nicely.

Next finger!

Make sure you rub it on really well.

No problem and super easy. :)

See! Easy!

Ta-DAH! All done. :)
Yay Nail Patches!
Friday, January 15, 2010
French Manicure

French Manicure, because I had a bottle of Revlon polish that I got from Big Lots a while ago, and wanted to see if it would make a good pink. :)
I like them. They're a little tame for what I'm used to, but it's nice to have something simple/elegant/normal.
What I used:
- Base Coat: Avon Nail Experts Smooth Beginnings Base Coat -- 1 coat
- Tips: Petites French White #417 -- 2 coats as needed
- Color: Revlon Post Trauma Nail Treatment Step 3 -- 2 coats, applied over the nail and tip
- Top Coat: Avon Nail Experts UV Gloss Guard: Top Coat -- 2 coats
- Drying Agent: Drip Dry by OPI -- 2 drops on each nail
Friday, December 11, 2009
Christmas Nails!

Yaaaay Christmas Nails! I love Christmas. I love the corny songs, getting the same presents every year, even the Christmas junk that I used to hate when I was little and now would love as a Christmas present.
These are my favorite nails yet! They look like wrapping paper. Sooooo cutie. I hope they last a LONG time because I'm not gonna wanna get rid of them anytime soon. The idea is thanks to a youtube tutorial and a suggestion from my sister to put snowflakes on red instead of blue. The snowflakes and larger white dots (snowballs) are stickers, the little white flecks are painted on with white nail polish.
Note to self: I need green nail polish. I don't have any green!
What I Used:
- Base Coat: Avon Nail Experts Smooth Beginnings: Base Coat --1 coat? I can't remember if I did a second.
- Red: Wet n Wild Rock Solid Nail Lacquer: #227 "Rockin in Rubies" -- 2 coats plus touch-ups
- White specks: OPI Nail Lacquer: "Alpine Snow" -- applied with a #306 Winning Nails by WorldWide Nail Art brush
- Stickers: Professional Nail Sticker, Sinyemei Nagel-Kunst from eBay.
- Top Coat: Avon Nail Experts UV Gloss Guard: Top Coat -- 2 coats
- Drying Agent: Drip Dry by OPI -- 2 drops on each nail
My left hand is INCREDIBLE shaky right when it matters, when the brush has white polish on it and it's about to touch my right hand fingernail. I'm steady up until 1 cm away and then BAM shaky shaky shaky. It's kind of nerve-wracking, actually.
Sunday, November 8, 2009
NOOOO The nail patches are awesome!!?
It's true. Well, it still needs to be verified beyond 30 minutes of awesomeness, but I love them.
 My sister surprised me a few weeks ago with these nail patches by Sephora, that you can view by clicking here. She had bought them on sale just for fun, because she knows about my latest obsession with nails. She and I had previously browsed through the nail section and upon spotting these, I immediately said, "That's stupid. That would never work." I was convinced that you had to cut the edges off, which in my case would be a horrible scenario because I have horrible aim and using scissors (no matter what the size or precision) to cut off excess plastic layer would not work. I assumed that it was retarded that anyone would pay more than what a nail polish bottle costs to buy some one-time-only nail patches that will never turn out okay.
She gave these to me later on, saying that even though I wasn't interested, they could still possibly be awesome.
They would either be awesome and the most wonderful thing in the world, or just as retarded as I initially suspected.
Well, thirty five minutes after the fact, I'm leaning toward the awesome side of the spectrum. They're easy to apply, and they ended up looking better than the paint jobs that I normally do every week (which sorta kills me, to tell you the truth.) And now I'm starting to suspect that my sister secretly looked at some amazing reviews and saw that I'd be wrong so she super spy purchased them for me, knowing how awesome they are. Cause my sister is super sneaky psychic sometimes like that, sometimes.
Anyway, yea, I like them. You peel off clear plastic from both sides of the colored patch, then apply it to your nail and wrap the end over the end of your nail. It's thick enough to take off and re-position if you mess up (suprisingly I didn't! isn't that weird!) but thin enough so that the excess that is hanging off after you fold them under rips off quite easily. And then you have perfect-looking nails that take less time than I usually take to apply a coat of perfect non-dinged nail-polish that gets removed with nailpolish remover just like the stuff from a bottle. UGH!
Geez. Okay, I hope they last the "yea but how long will they last" skepticism that's ringing in my head right now. I'll be sure to write about that later on this week and post a status pic of how they're doing. But beyond that, I like the nail patches.
What I used:

She gave these to me later on, saying that even though I wasn't interested, they could still possibly be awesome.
They would either be awesome and the most wonderful thing in the world, or just as retarded as I initially suspected.
Well, thirty five minutes after the fact, I'm leaning toward the awesome side of the spectrum. They're easy to apply, and they ended up looking better than the paint jobs that I normally do every week (which sorta kills me, to tell you the truth.) And now I'm starting to suspect that my sister secretly looked at some amazing reviews and saw that I'd be wrong so she super spy purchased them for me, knowing how awesome they are. Cause my sister is super sneaky psychic sometimes like that, sometimes.
Anyway, yea, I like them. You peel off clear plastic from both sides of the colored patch, then apply it to your nail and wrap the end over the end of your nail. It's thick enough to take off and re-position if you mess up (suprisingly I didn't! isn't that weird!) but thin enough so that the excess that is hanging off after you fold them under rips off quite easily. And then you have perfect-looking nails that take less time than I usually take to apply a coat of perfect non-dinged nail-polish that gets removed with nailpolish remover just like the stuff from a bottle. UGH!
Geez. Okay, I hope they last the "yea but how long will they last" skepticism that's ringing in my head right now. I'll be sure to write about that later on this week and post a status pic of how they're doing. But beyond that, I like the nail patches.
What I used:
- Nail Patch in "502 black strass" by Sephora.
Monday, October 5, 2009
October Week 2 -- spider webs!

Shoutout to my cat ZETA who unintentionally makes her debut today!
But anyway, I got done with the orange, then I put on some yellow to make it an "ooooo shimmery!" kind of look, and then my black tips came out okay. So... I felt like adding more.
Then I looked online for halloween nail tutorials, and t's amazing how many tutorials out there and it's even MORE amazing how IMPOSSIBLE it would be for my non-dominant hand to even TRY anything these tutorials suggest. Plus, a lot of them are tutorials on how to draw on a fake nail that's not attached to anything. And sure, anyone can do that. But when they're your own nails and they're attached to your hands already, you can't exactly follow a "Learn how to draw a Frankenstein" tutorial 10 times in a row.
Anyway, the youtube link again: http://www.youtube.com/watch?v=PTGVp2YOYQ4 See for yourself!
I like my nails now. No more spiteful plain nails!
What I used:
- Base Coat: Avon Nail Experts Smooth Beginnings Base Coat -- 1 coat
- First color: OPI Nail Lacquer in "In My Back Pocket" -- 3 coats
- Shimmer: Sephora by OPI Nail Colour in "Cab Fare" -- 1 thin coat
- Tips: Sally Girl Nail Color in "Poser" -- 2 coats
- Spider webs: Petites in "French White 417" -
- Applied with Nail Brush: Winning Nails by Worldwide #306 Nail Art
- Top Coat: Nailene Acrylic Strong Topcoat -- 1 coat
- Drying Aid: Sephora by OPI Nail Colour Drying Drops
I'm pretty sure you can use any kind of thin brush to paint designs. No need to shell out the money for an official nail brush, since it just gets coated with nail polish anyway.
This was my first time freehand drawing on my own nails. I know 1) for SURE I am right-handed and 2) thin lines are hard to make with frickin' nail polish and 3) I feel like I oughta try this more often!
Wednesday, September 16, 2009
Sally Haul 9.15.09

my new tweezers and stickers from sally's
Sorry, you'll have to excuse the drastically overstated use of the word "haul" to describe my two-item purchase at sally's, but I really couldn't help myself.
I went to Sally's and finally bought the Ocean Life set of Nail stickers by Cina, and a Tweezerman set of tweezers to use when I apply the stickers to my nails.

closer look at the sally's sticker so you can see what I mean
The awesome thing about Sally's is the Sally Beauty card. I became a member in January this year for the fee of $5 and got a $5 coupon to use in store the next month. Being a member means that you get a discount off of everything in the store. The secret to finding the price is to look at the numbers on the Sally tag: The actual price is written as a price with the dollar sign and all that good stuff. But the members price is at the end of the long number above that -- so my Stickers costed me $3.49 instead of the listed $4.39... which is awesome. And to top it off, I also used a 20% coupon that was good toward my entire purchase, so I got some super savings there too. I'm pretty happy right now. 
my old tweezers from my swiss army knife with a U.S. dime for size comparison
The tweezers were a purchase long in the making. I've been using my tweezers that came attached to my swiss army knife but they just aren't doing the trick. I mean, they worked in that they did their job but after my fiasco with the black hearts jumping off the plastic sheet I decided to go for some good ones. We'll see how it ends up -- either terrific or a waste of $3.50...
Oh yea, and I bought a set of Halloween stickers on eBay for $4.89. They were an international purchase so they'll take 7-14 days but I'm still excited. Halloween nails here I come!
And... I can't believe I finally got the ocean life set! Expect great things from me next week when I use these puppies. I have been wanting this set for EVER but didn't really know how I'd use them, but boyo, do I have an idea now. This oughta be good.
Sunday, September 6, 2009
Pink hotness, yep!
But first an update on the nails that I posted in my last blog:
They held up surprisingly well! My family went to Reno for a 4 night vacation at Harrah's and I was so sure that they would end up chipping by the end of the week. At the base of the nails I could see the color lightening a little, which meant (or at least I thought...) that they would start peeling and chipping. I'm used to lighter color meaning that the nail polish is separating from my nail surface and only hanging on because it's connected to the rest of the polish that's still attached. But hey, it lasted well until I got home.
Removing the nails was interesting. The last time I used stickers I had applied them to fake nails, so it was simply a matter of peeling off the nails and putting something on something new. Since then I've graduated to using my natural nails. When you wipe your nails with nail polish remover, you take off the nail color and the design on the sticker but the plastic stays on your nail, leaving a sticker-outline of the color you had underneath it. Then you have peel off the sticker and remove the polish leftovers and THEN you're done. It doesn't seem like a big deal, but it's about two more steps than I'm used to dealing with, which is a bummer but not SO bad, I guess.
Okay the new set:

What I used:
They held up surprisingly well! My family went to Reno for a 4 night vacation at Harrah's and I was so sure that they would end up chipping by the end of the week. At the base of the nails I could see the color lightening a little, which meant (or at least I thought...) that they would start peeling and chipping. I'm used to lighter color meaning that the nail polish is separating from my nail surface and only hanging on because it's connected to the rest of the polish that's still attached. But hey, it lasted well until I got home.
Removing the nails was interesting. The last time I used stickers I had applied them to fake nails, so it was simply a matter of peeling off the nails and putting something on something new. Since then I've graduated to using my natural nails. When you wipe your nails with nail polish remover, you take off the nail color and the design on the sticker but the plastic stays on your nail, leaving a sticker-outline of the color you had underneath it. Then you have peel off the sticker and remove the polish leftovers and THEN you're done. It doesn't seem like a big deal, but it's about two more steps than I'm used to dealing with, which is a bummer but not SO bad, I guess.
Okay the new set:

What I used:
- Base coat: Avon Nail Experts Smooth Beginnings -- 1 coat
- Color: Sephora by OPI Nail Colour in "Lost Without My GPS"-- 2 coats
- Tips: Sally Girl Nail Color in "Poser" -- 1 coat
- Accent Color: Savvy Nail Lacquer in "Golden Honey" -- 1 coat (little stripe on the black tips)
- Stickers: Broadway Nails Fashion Diva Nail Art "Find Me" -- applied with my pocket knife tweezers
- Top Coat: Nailene Acrylic Strong Topcoat -- 1 coat
- The stickers are difficult to get off the sheet. I had at least 4 stickers go flying when I picked them off.
- The stickers have examples on the back of how awesome your nails would look if you put more than 2 stickers on them. In real life, they just look ridiculous, like you couldn't decide which stickers to use and just kept going and going. Plus it's impossible to get them in a straight line with my left hand, which adds to the ridiculousness.
- I'm getting better at painting on tips. Even my sister says so. :)
Subscribe to:
Posts (Atom)