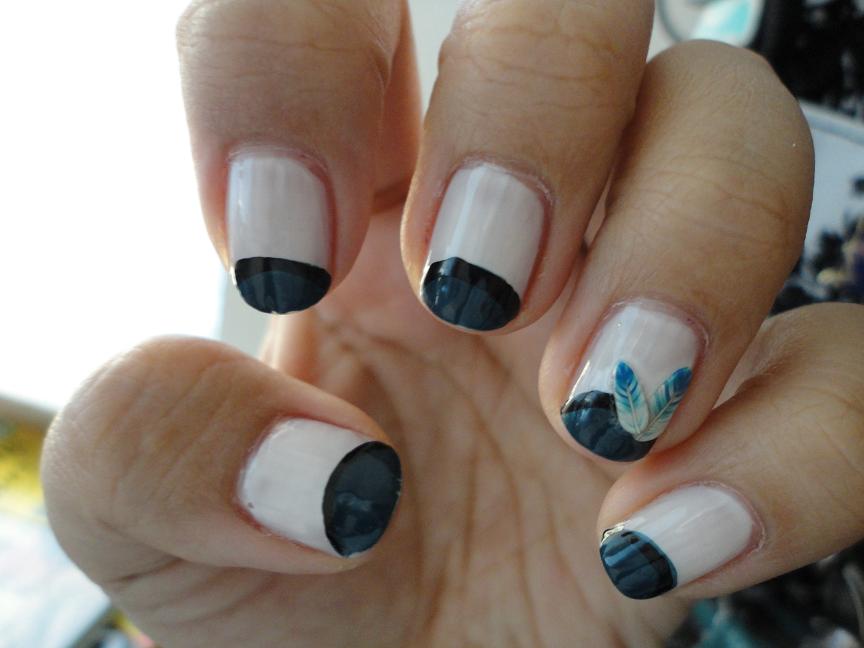
-Savvy Golden Honey: One coat
-Konad black with plate m64
-Rhinestones from Algeria (see previous post)
Showing posts with label nails. Show all posts
Monday, January 21, 2013
Gold with flowers and jewels
Labels:
golden Honey,
konad,
nail art,
nail stamping,
nails,
savvy,
stamping
Saturday, January 5, 2013
Nail Catch-up #1
Wow I have never fallen this far behind on posting nail photos! Sorry for the quick post. I got a lot of great new nailpolishes over the holiday season. I got some for my birthday, bought some for myself, and even got a whole new box for Christmas. But before I dig into them I really want to get caught up on all the photos I have saved on my computer and my phone. So here they are! Enjoy!
Tuesday, April 24, 2012
End of April Nails
Check that out, I actually posted a set of nails that I'm currently wearing instead of a "quick update" of nails I forgot to upload. Had a lot of fun with this one, and really happy with how it turned out.
Ingredients:
Seche Clear Base Coat
ORLY 40638 "Green with Envy": 2-3 coats
ORLY 40667 "Green Apple": 2-3 coats
Migi Nails Pen and brush: black for lines, blue for color blocking
Seche Vite Top Coat
Watch out if you try it yourself -- Seche Vite DOES streak the Migi Nail polish. So brush fast and get good coverage the first time!
Labels:
blue,
freehand,
green,
hand drawn,
migi nail art,
nail art,
nail polish,
nails,
orly,
pen,
polish,
seche vite,
stripes
Monday, April 16, 2012
Inspired by "Nailed It"
On Friday April 13th (dun dun dun) I saw a nail post from BlogNailedIt on Facebook and loved the photo so much I decided to try copying it. I didn't have either one of the nail polishes used in the original so I made up my own. Here's the original photo.
Ingredients:
1. OPI "My Private Jet" -- 2 coats
2. China Glaze Crackle "Oxidized Aqua" -- 1 coat
3. A glitter glue stick from the dollar store for the gold sprinkles
4. Sally Girl "812031" for the silver sprinkles -- 2 coats
That crackle sucks, but it was the closest in color that I could get to the photo -- which apparently isn't a blue color at all, now that I've researched the two polishes that were used. I like these nails, though. I'll wear them for a while.
Labels:
aqua,
blog nailed it,
blue,
china glaze,
crackle,
glitter,
nail art,
nail polish,
nailed it,
nails,
opi,
Sally,
sally girl,
sprinkles
2012 Nail recap!
January 20, 2012:
![]() |
| Just a quick one, using striping brushes. SEPHORA by O.P.I in "212-SEPHORA" |
Labels:
china glaze,
glitter,
gradient,
nail art,
nail design,
nail polish,
nails,
opi,
orly,
rhinestones,
stripes,
striping pen
Monday, January 16, 2012
Tuesday, September 20, 2011
Sunday, July 17, 2011
Super quick update - Pink and Green
Super quicky update on my nail blog. Unfortunately I didn't take a picture of my Fourth of July nails, but I don't consider that a huge loss because I didn't really like them (I did them in a super hurry the night before).
But here are some others for you to feast on until the next update! Enjoy!
Labels:
fingerpaints,
french sheer white,
green,
irredescent,
konad,
migi nail art,
nail art,
nail pen,
nails,
nina,
nina ultra pro,
pens,
pink,
sephora,
spring,
stamp,
stamping,
swirls
Sunday, April 10, 2011
Tuesday, February 15, 2011
Valentine Nails 2011
Well so much for me keeping updated! Here's a quick post on my latest Valentine Nails. Enjoy!
Last week:
Last week:
This week:
(Inspired by Whoa Nails! Valentine Nails -- her design was SO cute I had to try it! )
Happy Valentine's Day!
Labels:
hearts,
holiday,
nail art,
nail design,
nails,
sprinkles,
valentine,
valentine's day
Wednesday, January 19, 2011
Mermaid nails
The idea with this one was supposed to be a mermaid-under-the-sea-with-pearls deal. It didn't quite turn out as great as I had hoped but it's still cute. I like the different kinds of blues and greens I made up, and they each have their own unique shimmer too.
Sorry for the messier-than-usual. I ran out of q-tips and cotton pads so I had to do the best clean-up I could with just soap and water. :(
What I used: Unfortunately there was a lot of experimenting with layers so I don't know how many coats of each color I have on each finger. The listed colors are in order of application on each nail.
Sorry for the messier-than-usual. I ran out of q-tips and cotton pads so I had to do the best clean-up I could with just soap and water. :(
What I used: Unfortunately there was a lot of experimenting with layers so I don't know how many coats of each color I have on each finger. The listed colors are in order of application on each nail.
- Base coat: Avon Smooth Beginnings Base Coat
- Top coat: Seche Vite
- Pinky: Sally Girl 812047 + Nicole by OPI "It's Up to You" + Konad white w/ plate m27
- Ring finger: Avon mirror shine "Glisten" + ORLY "Green with envy" + Sally Hansen Xtreme Wear "09 Disco Ball" + Konad white w/ plate m60
- Middle finger: Zoya "Pippa" + Sally girl "Luv it" + Konad white w/ plate m79
- Index finger: Sally girl 812047 + ORLY "Green with envy" + Sally girl "Luv it" + Konad white w/ plate m79
- Thumb: Zoya "Pippa" + Sally girl "Luv it" + ORLY "Limelite" + Konad white w/ plate m79
Labels:
avon,
blue,
green,
mermaid,
mirror shine,
nail art,
nails,
nicole,
opi,
orly,
Sally,
sally girl,
Sally Hansen,
seche vite
Saturday, January 15, 2011
Haulin' out! - Sally Beauty Supply
Another haul because I'm so spendy lately. This one's thanks to my Sally Beauty Supply membership. I got a coupon in the mail that said if I spent $25 or more I'd get a free travel flat iron. Technically I already have a flat iron and don't even know how to use THAT one, but my sister had been wanting to try for some time so I used her as an excuse to BUY STUFF. That "buy stuff" should really be in bigger caps and larger font. Anyway, I went around Sally's with my basket and threw this stuff in. This is just the nail stuff I bought (to get to $25 I had to buy some other stuff but since it's not nail-related I thought I'd leave it out of the haul.)
| Picker upper for rhinestones, Sally Girl Nail color "812031" and Nail Art clay decals #380275 Blue Denim |
2. Sally Girl silver sprinkles: I call them sprinkles. :) I've been wanting some silver ones for a while now but never really felt the need to go into Sally's and charge .79 cents to my credit card. I love these sprinkles. I have the gold ones and the pink ones too. It's amazing how much they help "busy up" my nails when I'm really in the mood for sparklies.
3. Nail art clay decals: These are so frickin' cute. It probably didn't help that the package is "blue denim" themed so I automatically liked the color scheme. They're so frickin' cute. It includes flowers, butterflies, hearts and feather shapes. I'm really excited to use them. My sister -- the one who loves bunnies and anything "little," really -- could barely handle how cute they are. I let her have one as a gift. It's in her wallet. :D
Labels:
clay art,
decals,
haul,
nail art,
nail polish,
nails,
rhinestones,
sally beauty supply,
shopping
Wednesday, December 29, 2010
More Christmas Nails 2010
Apparently this week I forgot how to use a camera and all my pictures came out blurry. Sorry about that! Hopefully you get the idea, though.
What I used:
- Top and base coats: the usual Avon stuff
- Green undercoat: ORLY "Green with Envy" #40638 -- 1 coat
- Sparkley Green: China Glaze "Watermelon Rind" #80226 -- 1 coat
- Gold stamp: Savvy Nail Lacquer in "Golden Honey" #627088 with Konad stamp m60
- Stickers: Random snowflake stickers from my box. (Sorry, I don't know what brand they were)
- White snowballs: OPI Nail Lacquer in "Alpine Snow" applied with the end of a paintbrush
- Gold Confetti: Sally Girl #812070
Wednesday, December 8, 2010
Birthday Nails
Last Saturday, December 4, was my 27th birthday! Yaaaaay! Here are my birthday nails. This is my first time doing rhinestones.
The rhinestones were actually fun. I've always thought that anything 3D that I put on my nails would really get in the way, and it wasn't ENTIRELY true. I did have a few times when I wanted to scratch my ear and had to force myself not to for fear that I might drop a rhinestone in, but the final verdict is that I like 'em. I wouldn't do it all the time but I like it.
What I used:
The rhinestones were actually fun. I've always thought that anything 3D that I put on my nails would really get in the way, and it wasn't ENTIRELY true. I did have a few times when I wanted to scratch my ear and had to force myself not to for fear that I might drop a rhinestone in, but the final verdict is that I like 'em. I wouldn't do it all the time but I like it.
What I used:
- Top and base coat: the usual!
- Blue: Nicole by OPI in "It's up to you" -- 2 coats
- Stamp:
- Konad stamp m64
- Konad white nail polish
- Rhinestones:
- The ones that came in my Konad set that my sister bought me. :) I love you stupid.
Coming up:
Christmas nails and Mini hauls. I bought two new colors from Target that I'll show off, plus I have two more Konad plates coming in the mail. I got some birthday money from my dad and decided to spend it on lots of little things instead of one big thing, so now I'm one happy 27-year-old with DVDs and a cute apron and nail stuff and DVDs on the way. Come in UPS, step on it!
Sunday, December 5, 2010
Pink henna night
Last Saturday, on November 27th I went to a henna night for my friend who's having her wedding reception on December 11th. Her husband's family (she and her husband were officially married last year when I was out of state for school) is Afghani the henna night is a traditional celebration with lots of dancing and money and gifts and photographs. It was pretty amazing and I had never seen anything like that before.
The theme was "pink" so I wore a pink dress and did my nails for the occasion. Enjoy!
What I used:
- Top and base coat: the usual (click here)
- Pink: Sally Hansen Insta-Dry Fast Cry Nail Color in #16 Blush Rush -- 2 coats
- Flowers:
- Sephora by OPI Nail colour in "What a Broad"
- Konad plate m64
- Glitter: Sally Girl #812005
Saturday, November 20, 2010
Disneyland!
In celebration of my graduation this year, my sister's graduation last year and my dad's re-election as mayor, I bought my family a 3-night vacation in Disneyland in Anaheim. We were there from the 15th until the 18th, and it was spectacular. Nice weather, barely any lines, not too crowded. We had a blast.
In my excitement, I did some Mickey nails for the trip. These came out less-than-ideal but I was exhausted by the time I had reached this point and just decided to call it quits. My original design was red nails with blue tips with stars/moons like the Sorcerer's Apprentice Mickey, but by the time I finished both hands I just wasn't happy with it. So, I started over and ended up with this.
Strangely, my left hand did a better job of painting than my right hand did... it was weird.
This picture was taken at the park in Tomorrowland. It was cold and my hands were dry. :P
What I used:
In my excitement, I did some Mickey nails for the trip. These came out less-than-ideal but I was exhausted by the time I had reached this point and just decided to call it quits. My original design was red nails with blue tips with stars/moons like the Sorcerer's Apprentice Mickey, but by the time I finished both hands I just wasn't happy with it. So, I started over and ended up with this.
Strangely, my left hand did a better job of painting than my right hand did... it was weird.
This picture was taken at the park in Tomorrowland. It was cold and my hands were dry. :P
What I used:
- Top and Base coat: The usual!
- Red base: Wet n Wild in "Red Red": 1-2 coats
- Tips: Nicole by O.P.I. in "Razzle Dazzler" -- 2 coats
- Mickeys: Konad white polish, and same red base polish, applied with the handle end of a paint brush I found on my desk
- Sparkles: Just a little bit of Sally Girl #812070 on the sides.
Labels:
celebrate,
celebration,
disney,
disneyland,
glitter,
graduation,
land,
mickey mouse,
nails,
vacation
Friday, January 15, 2010
French Manicure
French Manicure, because I had a bottle of Revlon polish that I got from Big Lots a while ago, and wanted to see if it would make a good pink. :)
I like them. They're a little tame for what I'm used to, but it's nice to have something simple/elegant/normal.
What I used:
- Base Coat: Avon Nail Experts Smooth Beginnings Base Coat -- 1 coat
- Tips: Petites French White #417 -- 2 coats as needed
- Color: Revlon Post Trauma Nail Treatment Step 3 -- 2 coats, applied over the nail and tip
- Top Coat: Avon Nail Experts UV Gloss Guard: Top Coat -- 2 coats
- Drying Agent: Drip Dry by OPI -- 2 drops on each nail
Wednesday, December 30, 2009
Winter Wonderland
Winter Wonderland, so accurately named by my sister.
Butterflies and flowers and snowflakes, because I had a magically butterfly-filled chick-flicky week leading up to Christmas this year. I'd love to dish the details, but a nail blog probably isn't the place for it... haha!
I used my new Avon Mirror Shine in "Glisten." It took two coats to get it like this, and boy are they shiny. Did you know it's difficult to photograph something super shiny with white stickers on it? Good thing I took advantage of our visit to Aveda and their salon with a billion lights. I was redeeming a birthday gift postcard for a free perfume essence in a scent of my choice. And if you must know, I got the oil in Fire Nature #20. :)
What I used:
Butterflies and flowers and snowflakes, because I had a magically butterfly-filled chick-flicky week leading up to Christmas this year. I'd love to dish the details, but a nail blog probably isn't the place for it... haha!
I used my new Avon Mirror Shine in "Glisten." It took two coats to get it like this, and boy are they shiny. Did you know it's difficult to photograph something super shiny with white stickers on it? Good thing I took advantage of our visit to Aveda and their salon with a billion lights. I was redeeming a birthday gift postcard for a free perfume essence in a scent of my choice. And if you must know, I got the oil in Fire Nature #20. :)
What I used:
- Base Coat and Top coat as usual, lots of top coat though
- Color: Avon Mirror Shine Nail Enamel in "Glisten" -- 2 coats.
- Stickers: Random leftover stickers from some sticker sheets in my box. Don't have the labels for them anymore.
Labels:
avon,
butterflies,
decal,
flowers,
nail art,
nail polish,
nails,
stickers,
winter,
wonderland
Thursday, December 24, 2009
Merry Christmas 2009!
I did a supah christmas theme this week. :)
From left to right: Christmas bow, stocking, present, gingerbread man, candy cane, reindeer (my sister's favorite), snowman, santa, holly, christmas tree.
These took a long time to do, but luckily I've discovered that if you play video games in between coats it can really make the time go by.
Used a LOT of stuff for this one. Here we go.
What I used: (in the order they were applied)
What I learned:
From left to right: Christmas bow, stocking, present, gingerbread man, candy cane, reindeer (my sister's favorite), snowman, santa, holly, christmas tree.
These took a long time to do, but luckily I've discovered that if you play video games in between coats it can really make the time go by.
Used a LOT of stuff for this one. Here we go.
What I used: (in the order they were applied)
- Base coat - the usual
- Gold Dots: Sally Girl Nail Color "#812070" -- 1 coat
- Sparkles: Sally Hansen Xtreme Wear Nail Color in "09 Disco Ball" -- little bit on each nail
- Snowflake Stickers: From a pack I bought on eBay. "Professional Nail Sticker" Sinyemei. Cut with a scissors and then applied to the edges of my nails.
- Gold Color: Savvy Nail Lacquer in "Golden Honey 627088" -- 1 stripe across the tip
- White Stripe: OPI Nail Lacquer in "Alpine Snow" -- applied with a toothpick
- Red Stripe: Wet n Wild Nail Color in "Red Red" -- applied with a toothpick
- Green Stripe: China Glaze Nail Lacquer with Hardeners in "718 Watermelon Rind 80226" -- 3 coats across the tips
- Stickers!!! My Favorite part! Cina Nail Creations "Holiday Cheer 133879" and the snowman is from another sheet I got on eBay.
- Top Coat - the usual -- 2-3 coats.
What I learned:
- It's difficult to find a green color that I will use for the rest of the year. There are plenty of Christmas greens out there but I didn't want to buy something I'd only use once, so I'm glad I found this China Glaze Watermelon Rind. It's fun and sparkly and should be useful for other nail designs. It's a lot more translucent than I was expecting so it took more coats than expected to make it look solid, but I like it.
- I had my first experience with using a real nail file that my sister bought as part of a present for my birthday earlier this month. I've been using some little files that were 99 cents for about 10 files? (what seems like a million, I keep finding more) at a grocery store. Thought they were fine, but then this new file from Body Shop is fabulous and gold and makes filing SO smooth and easy and FAST. Who would have thought? Anyway, I'm sold, and I love using the "real" kind of nail file. Yay my sister!
Subscribe to:
Posts (Atom)